Model Context Protocol in .NET
Summary
MCP standardizes how applications provide context to LLMs.
Model Context Protocol (MCP): Think of MCP as a standardized way for apps to give Large Language Models (LLMs) the right information they need to do their job well. It’s like giving a chef all the specific ingredients and instructions they need to cook a particular dish.
To understand MCP, it helps to compare it to REST. While REST is excellent for fetching data, MCP is designed for providing context. Think of REST as asking what data exists, while MCP focuses on how to give an LLM the necessary information to understand a request and respond appropriately.
MCP in .NET
In world of .NET we are able to leverage the power of MCP through a dedicated SDK, making implementation straightforward and efficient. Building your own MCP server becomes a simple task using the .NET SDK.
We just need to install the package:
dotnet add package ModelContextProtocol --prerelease
In console applications, we also need to install the hosting package to properly set up the service infrastructure:
dotnet add package Microsoft.Extensions.Hosting
Then we can create a simple server:
using Microsoft.Extensions.DependencyInjection;
using Microsoft.Extensions.Hosting;
using Microsoft.Extensions.Logging;

var builder = Host.CreateApplicationBuilder(args);
builder.Logging.AddConsole(consoleLogOptions =>
{
    consoleLogOptions.LogToStandardErrorThreshold = LogLevel.Trace;
});

builder.Services
    .AddMcpServer()
    .WithStdioServerTransport()
    .WithToolsFromAssembly()
    .WithPromptsFromAssembly();

await builder.Build().RunAsync();
Understanding MCP Configuration
WithStdioServerTransport() configures the server to communicate through standard input and output (stdin/stdout). This is useful when the MCP server is launched locally by a client process. The server operates as a single-session service and terminates when the stdin stream is closed.
WithToolsFromAssembly() scans our code for classes with the McpServerToolType attribute and registers methods marked with the McpServerTool attribute.
WithPromptsFromAssembly() scans our code for classes with the McpServerPromptType attribute and registers methods marked with the McpServerPrompt attribute. This allows us to define reusable prompt templates that can be easily invoked by AI assistants.
MCP Tools Examples
Let’s look at a practical example of an MCP tool - a simple shopping cart manager:
[McpServerToolType]
public sealed class ShoppingCartTool
{
    private static readonly List<string> Cart = new();

    [McpServerTool, Description("Adds an item to the shopping cart.")]
    public string AddItem([Description("The item to add to the cart")] string item)
    {
        Cart.Add(item);
        Console.WriteLine($"Added to cart: {item}");
        return $"Added '{item}' to your shopping cart.";
    }

    [McpServerTool, Description("Gets all items in the shopping cart.")]
    public string GetCartItems()
    {
        if (Cart.Count == 0)
        {
            return "Your shopping cart is empty.";
        }

        return $"Your shopping cart contains: {string.Join(", ", Cart)}.";
    }
}
This example demonstrates a simple tool that manages a shopping cart. The class is marked with McpServerToolType attribute, which registers it with the MCP server. Each method is decorated with the McpServerTool attribute, making it available for LLMs to use.
The Description attributes provide documentation that helps the LLM understand the purpose of each method and parameter. When the LLM needs to interact with a shopping cart, it can leverage these methods to add items or check the cart’s contents, providing a natural and intuitive way for users to manage their shopping through language.
MCP Prompts Examples
In addition to tools, MCP servers can also provide reusable prompt templates that make it easy to standardize common AI interactions. Prompts are pre-defined templates that can be quickly invoked and customized for specific use cases.
Let’s look at an example of MCP prompts for our shopping scenario:
[McpServerPromptType]
public sealed class ShoppingPrompts
{
    [McpServerPrompt, Description("Generate shopping recommendations based on current cart or dietary preferences")]
    public string ShoppingRecommendation(
        [Description("Dietary preference (vegetarian, keto, mediterranean, etc.)")] string dietaryPreference = "balanced",
        [Description("Budget range (low, medium, high)")] string budget = "medium")
    {
        var prompt = $"You are a helpful shopping assistant. Based on the dietary preference '{dietaryPreference}' " +
                     $"and budget range '{budget}', suggest a complete shopping list with 8-10 items. " +
                     $"Include fresh produce, proteins, and pantry staples. " +
                     $"Provide brief explanations for your choices and estimated total cost.";

        return prompt;
    }
}
This example demonstrates how to create reusable prompt templates. The class is marked with McpServerPromptType attribute, and each method is decorated with the McpServerPrompt attribute. These prompts can be easily invoked by AI assistants, providing consistent and well-structured interactions.
The prompt templates allow you to:
- Standardize interactions: Create consistent prompts for common tasks
- Parameterize content: Use method parameters to customize prompts dynamically
- Improve efficiency: Quickly access pre-built prompts instead of writing them from scratch each time
Visual Studio Code Configuration
To use your MCP server with Visual Studio Code, you need to configure it properly. This involves creating a configuration file that tells VS Code how to connect to your MCP server.
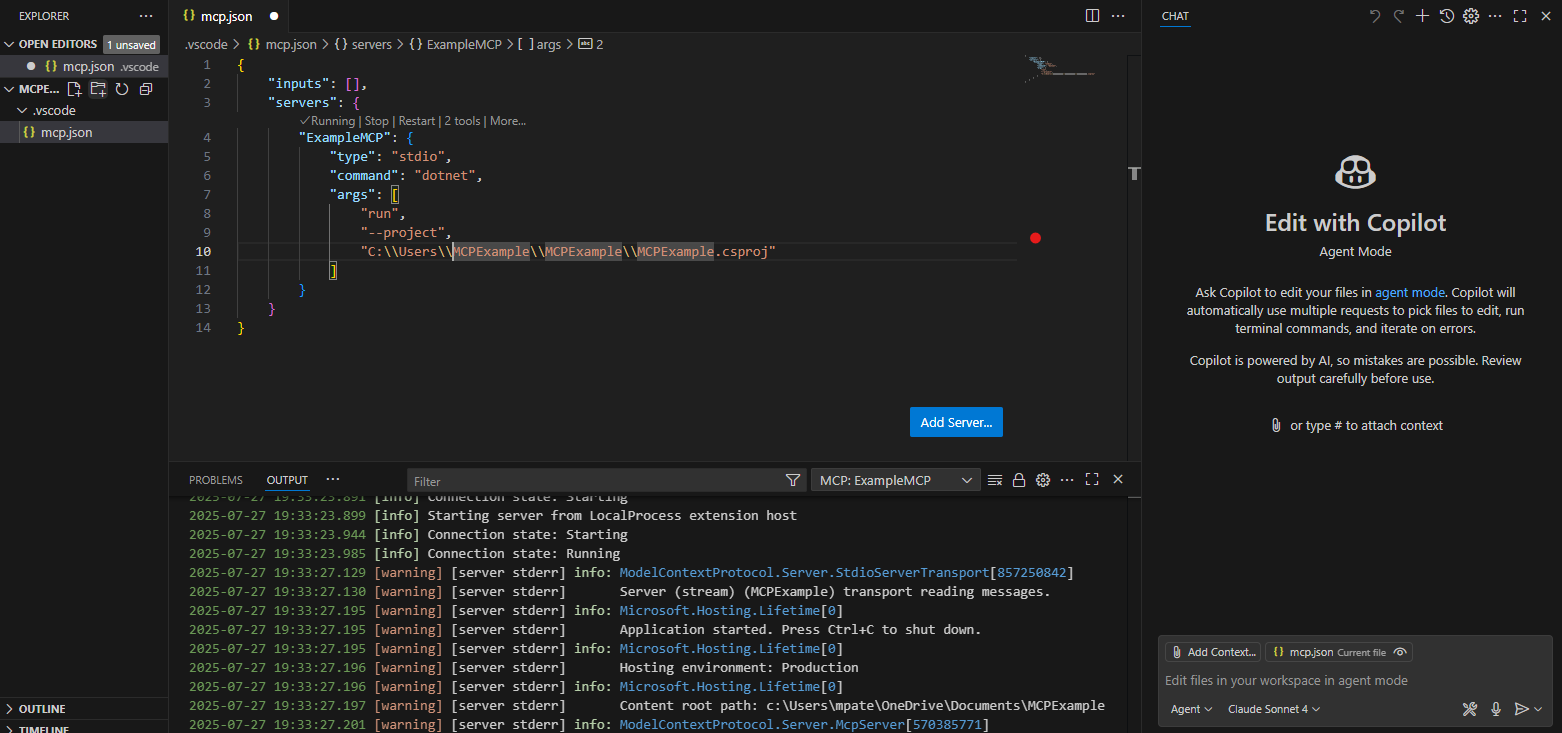
You need to create a new file in the .vscode folder named mcp.json with the following structure:
{
  "inputs": [],
  "servers": {
    "ExampleMCP": {
      "type": "stdio",
      "command": "dotnet",
      "args": [
        "run",
        "--project",
        "C:\\Users\\MCPExample\\MCPExample\\MCPExample.csproj"
      ]
    }
  }
}
This configuration tells VS Code:
- inputs: An array of input configurations (empty in this case)
- servers: An object containing your MCP server definitions
- ExampleMCP: The name of your MCP server (you can choose any name)
- type: Set to “stdio” for standard input/output communication
- command: The executable to run (in this case, “dotnet”)
- args: Arguments passed to the command, including the path to your MCP project
Once you’ve created this configuration file, you’re ready to use your MCP tool directly within Visual Studio Code. The editor will automatically detect and connect to your MCP server, making your custom tools available for use with AI assistants and other MCP-compatible features.
Using MCP in VS Code Agent Mode
To interact with your MCP server, you need to enable Agent Mode in Visual Studio Code. Agent mode allows the AI assistant to access and utilize your custom MCP tools during conversations.
When you activate agent mode and click on the Tools section, you’ll be able to see your custom MCP server listed among the available tools. This provides a seamless integration where the AI can leverage your custom functionality to help with various tasks.
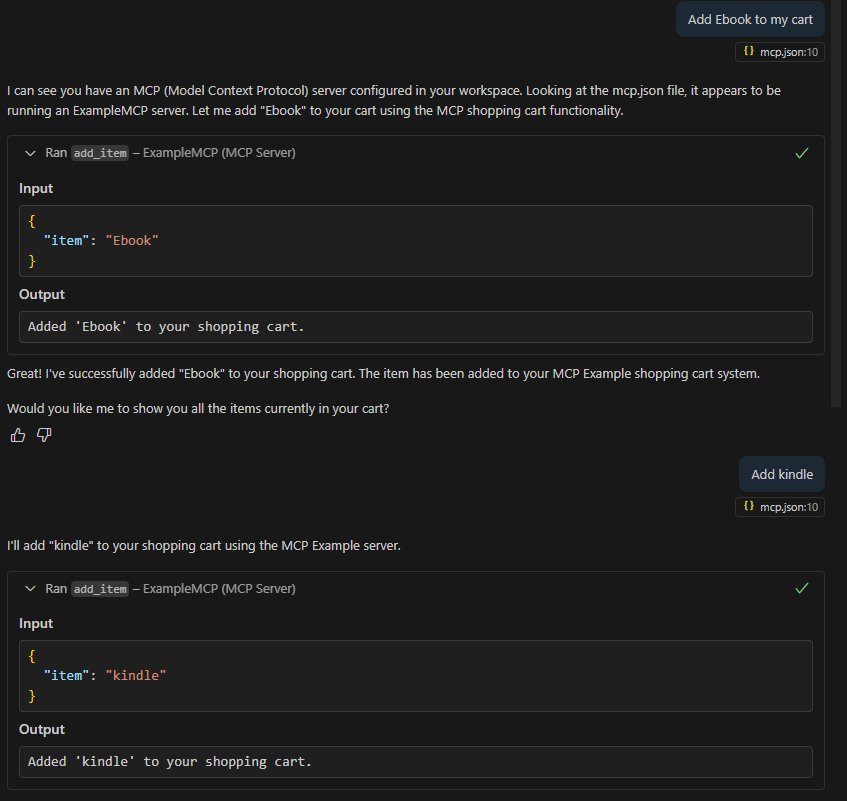
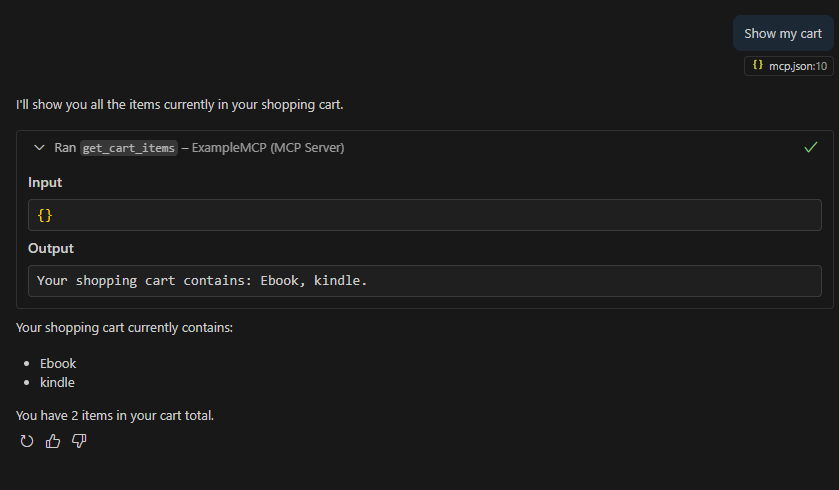
The demonstration above shows how the MCP server integrates with VS Code’s agent mode. You can see the custom shopping cart tools being recognized and used by the AI assistant, providing a natural way to interact with your MCP-powered functionality through conversation.
One of the powerful features of this integration is the ability to see both the input that was sent to your MCP server and the output it returned. This transparency makes debugging your MCP tools incredibly easy - you can track exactly what parameters were passed to your methods and verify that the responses are what you expected. This visibility is invaluable when developing and troubleshooting your custom MCP functionality.
Summary
Model Context Protocol is a powerful functionality that enables us to make everything we can code work with our Copilot, which greatly increases the possibilities of usage of Copilots and chats. By creating custom MCP servers, we can extend AI assistants with any functionality we can imagine and implement, making them truly versatile tools that can interact with our specific business logic, APIs, databases, or any other systems we work with.
Resources
comments powered by Disqus